Manual, Installation Instructions for Bloomfield HW-106D Coffee Maker, Food Warmer (1 pages)
Data: UPD 10th April 2024
Bloomfield HW-106D Coffee Maker, Food Warmer PDF Installation Instructions (Updated: Wednesday 10th of April 2024 03:04:37 AM)
Rating: 4.6 (rated by 18 users)
Compatible devices: WV-4HF, MOD-400TDMAF, SS-4, 8782, MOD-200TDMAF, 9121, 2121, HT-200AF.
Recommended Documentation:
Text Version of Bloomfield HW-106D Coffee Maker, Food Warmer Manual (Summary of Contents)
(Ocr-Read of Document's Main Page, UPD: 10 April 2024)
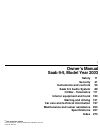
1/2 NPT
DRAIN
IMMERSION
HEATING
ELEMENT
12
(305)
10 1/4
(260)
5 7/8
(149)
6 1/4
(159)
3 1/4
(83)
4 13/16
(122)
8 1/8
(206)
4
(102)
1 3/8
(35)
COUNTERTOP
SCREWDRIVER
WELLSLOK
GASKET
WARMER FLANGE
UNIT TO THE NEAREST SURFACE
MINIMUM CLEARANCE REQUIRED FROM
4
(102)
1
(25)(76)
33
(76)
FRONTBOTTOMSIDEBACK
CLEARANCES
INSTALLER MUST MEET CONDITIONS OF ACCEPTABILITY
OUTLINED BELOW UPON INSTALLATION:
1. Required installation clearances:
Wooden and Metal Installation: DO NOT install closer than
4 1/8 inches to front wall, 3 inch to back and side walls,
and 1 inch to a surface below the unit. If the control
box is located below the unit, the front clearance may be
1 inch.
2. Unit shall be accessible for servicing from the bottom.
3. If storage is to be used underneath the unit, it is
recommended that a baffle be placed 8 1/2 inches below
the unit to avoid contact with elevated temperatures.
TO FABRICATE:
1. Lay out "cutout" dimensions on countertop and front
apron.
2. Lay out and fabricate control panel holes in counter
apron using the control box as a template.
3. Cut out holes.
TO INSTALL:
IMPORTANT - DO NOT disconnect lead wires from the Master
Control Panel when making installation.
1. Tilt and pass Control Panel and electrical box through
the countertop cutout, then through the apron cutout.
Lower modular section into countertop cutout and position.
RECOMMENDATION: Before final seating of modular section
to countertop, apply a bead of silicone adhesive/sealant
to the underside of gray gasket material supplied on the
mounting flange.
2. From underneath, insert screwdriver into slots in
Wellslock frame and twist ears outward (clockwise) as
required to secure flange tightly to countertop.
3. Mount Control Box to apron cutout as shown in drawing.
4. Mount Control Panel onto electrical box using the screws
supplied.
PRODUCT DIMENSIONSCUTOUT DETAILS
90°C
90°C
90°C14 AWB Cu
14 AWB Cu
14 AWB CuSINGLE
SINGLE
SINGLE6.9
6.0
13.8
1650
1240
1650120
208
240HW-106D
HW-106D
HW-106D
RATING
GAUGE
FIELD
TEMP.
WIRINGPHASEAMPSWATTSVOLTSMODEL
ELECTRICAL
WELLS/BLOOMFIELD * VERDI, NV
MODEL HW-106D
BUILT-IN FOOD WARMER
INSTALLATION INSTRUCTIONS
37210-1   REV (A)
TO PLUMB:
1. Warmers with a 'D' suffix are supplied with individual
1/2" female N.P.T. drains.
2. Connect to sutable drain line.
TO WIRE:
1. Final connection is accomplished by bringing proper
power supply leads (see 'WIRING REQUIREMENTS' label)
through conduit knockout to terminal block supplied within
the Master Control Panel. Check nameplates for voltage
and phase.
2. DO NOT connect to a circuit operating at more than 150
volts to ground (240 volt models only).
NOTE: INSTALLATION MUST MEET LOCAL PLUMBING AND
ELECTRICAL CODES.
INSTALLATION INSTRUCTIONS
FRONT PANEL CUTOUTTOP CUTOUT
10
(254)
11
(279)
4 9/16
(116)
4 7/8
(124)
2 15/16
(75)
INCHES
(MM)
Recommended:
2003 9-5, SMCWCB-N, FT-900, FWD-32LX2F
GRBW-24, HOTCABI, CombiMate 12-20MW, MG-2, Proctor Silex, Mobile Carving Station GC-89
-
500-1DN500-2DN500-3DNDRAWER WARMERSDUE TO ONGOING PRODUCT DEVELOPMENT, SPECIFICATIONS ARE SUBJECT TO CHANGE WITHOUT NOTICE.PRINTED IN U.S .A . #18A - 10/05ITEM NO. _______________________ANSI/NSF 4ADDITIONAL FEATURES & OPTIONS●Built-in Trim kit● Caster Stand Assembly● Leg Stand Assembly� ...
Model & Doc Type: 500-1DN 2
-
W164 N9221 Water Street • P.O. Box 450Menomonee Falls, Wisconsin 53052-0450 U.S.A.PHONE: 262.251.3800 • 800.558.8744 U.S.A. / CANADAFAX: 262.251.7067 • 800.329.8744 U.S.A. ONLYwww.alto-shaam.comConsult instructions for operation and use.20-20MWMN-36608 (Rev. 5) • 06/18Printed ...
Model & Doc Type: CombiMate 20-20W 27
-
Hatco is leading the way with innovative technology thatimproves heated merchandiserswhich add food safety to “showand sell” areas and generatemore impulse sales. UtilizingHatco’s patented heated glasstechnology, the fully transparentshelf increases holding capacity,while using ...
Model & Doc Type: GR3SDH-39 6
-
ElectronicCold/HotServing Trayby Urbina DesignTMTMAs a Cold Tray:• Eliminates need formessy melting iceAs a Hot Tray:• Electronic no flame,no smoke.Model Number:ST ECT 10SS• Quiet and convenient• Easy to clean Stainless Steel• One Year Limited Warranty• Non Stick, immersible aluminum ...
Model & Doc Type: Stanza ST ECT 10SS 1
Operating Impressions, Questions and Answers: