Data: UPD 29th March 2024
X10 IN49A Oven PDF Setup Instructions (Updated: Friday 29th of March 2024 09:02:17 PM)
Rating: 4.8 (rated by 10 users)
Compatible devices: VBD578FS0, H6160BP, OX611T, Cook, HB556AB.0, Competence 53081 B, FBO-9, BEB351010B.
Recommended Documentation:
Text Version of X10 IN49A Oven Manual (Summary of Contents)
(Ocr-Read of Document's Main Page, UPD: 29 March 2024)
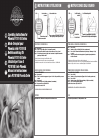
Connect the Firecracker Computer Interface
The Computer Interface
(model CM17A) uses
wireless signals to transmit
X10 control commands from
the computer to the
transceiver module included in the kit.
Connect the Interface directly to your
PC's serial port. If there is already a
device connected to this port, unplug
it, connect the Computer Interface, and
then plug the other device into the connector on the
CM17A. Important: Do not plug your mouse into the
CM17A!
Configure Your Cameras in XRay Vision
Run XRay Vision. Right click in the program
window and choose "Settings" then
"Preferences" from the pop-up menu. Click on
the "Cameras" tab in the configuration window.
Click on the "Add" button to create an entry
for a camera. Click into the "Camera Code" box and enter
the House and Unit code for this camera. Make sure to
enter the letter and number without a space between
them. In the "Comment" box you can type a description
or name for this camera. Repeat these steps for all the
cameras you set up earlier.
You are now ready to control your cameras from XRay
Vision. Right click in the XRV window and choose
"Camera." You will be able to select from your different
cameras, or tell XRV to automatically switch between all
of them.
Installing XRay Vision Remote Viewer
After you have installed the XRay Vision server,
you can use the XRay Vision remote viewer
look at your images from any PC connected
to the Internet. Once again you need to
download the software from:
http://www.x10.com/xrv
This time choose the remote software. Run the file Remote
installation application and follow the installation
instructions. You are now ready to connect to your XRay
Vision server and download images.
For more help, see:
http://www.x10.com/support
Your X10 multi-camera system allows you to control X10
XCam2™ cameras from your PC and view each camera from
the XRay Vision™ software. Follow these instructions to set
up the necessary hardware and software.
Installing the XRay Vision Software
Before you connect the Video to USB Converter
(model VA10A) you must first install the drivers
and XRay Vision Software. First, download the
XRay Vision server software from X10.com at:
http://www.x10.com/xrv
Next, run the Server installation application. Select the directory
where XRay Vision will be installed and decide how you want
XRay Vision listed on your Windows Start menu. After that,
the XRay Vision installation program will automatically finish.
You are now ready to set up the Video to USB Adapter.
Connecting the USB Video Capture Adapter
When the installation program instructs you to, plug
the Video to USB Converter connector into a USB
port on your computer. The computer will recognize
that new hardware has been installed and complete
the installation.
Set Up the Transceiver Module
Make sure you have connected the Transceiver
(model TM751) to a nearby power  outlet. The
outlet you use should not be too close to the back
of your PC, as your PC may create some electrical
noise that could reduce the range of the transceiver.
Set the House Code (letter dial) on the Transceiver to the
letter you will use for your cameras.
Connect the Video Receiver to the Video
Capture Adapter
Plug the yellow video plug on
the supplied cable into the Video
Out jack on the VR30A. Connect
the other end of the cable to the
yellow Video In jack on the Video Capture
Adapter. Plug the PR30A power supply into
any 120V AC outlet. Plug the power output
of the PR30A into the DC 12V plug on the
VR30A. Make sure the Channel switch on
the underside of the VR30A should be set
to the same letter as that on the XCam2.
Setting Up XRay Vision with Multiple Cameras
© Copyright 2000 X10 Wireless Technology, Inc.
MODEL
NUMBER:
IN49A
SETUP
INSTRUCTIONS
Recommended:
VU-V108, 29HT3312, PTLB60NTU, EQmatic
SC88X, NN-DS596MEPG, HDL-718, 7OFH G IX RU/HA, S 890
-
Contents39EN1 Instructions 401.1 General safety instructions 401.2 Instructions for using microwaves 411.3 Manufacturer liability 431.4 Appliance purpose 431.5 Identification plate 431.6 Disposal 431.7 This user manual 441.8 How to read the user manual 442 Description 452.1 General Descri ...
Model & Doc Type: SF4309MXK 36
-
7OFH G RU/HA7OFH G IX RU/HA7OFHRG RU/HAGOS 7 A RFHGOS 7 I RFH EnglishOperating InstructionsOVENContentsOperating Instructions,1Warnings,2Assistance,3Description of the appliance,4Description of the appliance,5Installation,6Start-up and use,10Cooking modes,11Precautions and tips,13Mainten ...
Model & Doc Type: 7OFH G IX RU/HA 24
-
Technical Information—Dual Fuel Slide-In Range February 2006 1 16026930 © 2006 Maytag Services JDS8850BD* JDS9860BD* JDS9865BD* • Due to possibility of personal injury or property damage, always contact an authorized technician for servicing or repair of this unit. • Refer to Se ...
Model & Doc Type: JDS8850BD 16
-
Contents 1. INSTRUCTIONS FOR SAFETY AND USE___________________________ 30 2. INSTRUCTIONS FOR DISPOSAL ________________________________ 32 3. INSTALLATION________________________________________________ 33 4. DESCRIPTION OF CONTROLS___________________________________ 35 5. ...
Model & Doc Type: S 890 26
Operating Impressions, Questions and Answers: