Data: UPD 12th November 2023
Edge 3 Port USB Hub Plus 9-in-1 Reader Switch PDF Quick Install Manual (Updated: Sunday 12th of November 2023 06:32:33 AM)
Rating: 4.1 (rated by 77 users)
Compatible devices: R177M, ATB-300, EMG8305 Series, SB-5645LCM-CT, SRW208G, Ultra-Mini U202-004-R, Brocade M5424, IFS+402GSM-4PHE24.
Recommended Documentation:
Text Version of Edge 3 Port USB Hub Plus 9-in-1 Reader Switch Manual (Summary of Contents)
(Ocr-Read of Document's Main Page, UPD: 12 November 2023)
This Product is backed by a Limited Lifetime Warranty.
For complete warranty information visit www.edgetechcorp.com/register
NEED
HELP?
TECH SUPPORT
www.edgetechcorp.com/support
3770 Ver4(03-05)
EDGE
TM
3 Port USB Hub
Plus 9-in-1 Reader
Quick Install Guide
327 East 14th Street / Ada OK 74820 (800) 332-6581 / (580) 332-6581 / www.edgetechcorp.com
EDGE
TM
is a trademark of EDGE Tech Corp. Trademarked words or logos used herein are property of their respective owners.
IMPORTANT
PLEASE CONTACT A QUALIFIED TECHNICIAN FOR ASSISTANCE IN INSTALLING OR USING THIS PRODUCT IF YOU ARE NOT
FAMILIAR WITH DOING SO. ANY INSTRUCTIONS INCLUDED WITH THE PRODUCT ARE FOR CONVENIENCE ONLY AND ARE NOT
INTENDED TO BE ALL-INCLUSIVE.
Thank you for purchasing the EDGE
TM
3 Port USB Hub Plus 9-in-1
Reader! Enjoy the convenience of having additional USB ports for
your desktop use as well as a 9-in-1 Card Reader that supports
today’s most popular digital formats. Complete with an external
power supply, this product offers you the flexibility and convenience
of a USB Hub and a multi-card reader. Thank you for purchasing
EDGE!
Windows 98, 98SE, or Windows 2000 (SP1 or SP2) Systems
Note: Do not connect the reader before turning the machine on
or installing the driver!
1. Download the driver from our website at www.edgetechcorp.com/
support/downloads. Choose product and download the .zip file for the
operating system being utilized, either Windows 98 or Windows 2000
(Note: remember where the file is saved).*
2. Browse to the folder where the file is saved and extract the files.
Double click the “setup.exe” file if using Windows 98, or double click
“install.exe” if using Windows 2000. Follow the onscreen instructions.
3. Next, restart the computer.
4. Once the machine has rebooted, connect the Reader’s USB plug to
the USB port on your PC or USB Hub. The 9-in-1 Reader should now
show up in “My Computer” as 4 additional removable drives, one for
each port on the reader. The digital media card may now be used as
a portable storage device, accessible through standard file access
methods.
Note: Prior to removing the digital media card from the reader,
the card must be disconnected. Failure to do so may cause data
corruption and render the card unusable.
To disconnect the card, proceed with either of the following steps:
A. Double-click the “My Computer” icon on the desktop. Right-click
on the appropriate removable disk icon and select the “Eject” option.
Wait for the disconnect confirmation prior to removing the card.
B. Left-click on the PC card with the green arrow in the system tray.
On the pop-up menu, highlight the appropriate card to remove, and
then select “Stop USB Mass Storage Device.” Wait for the disconnect
confirmation prior to removing the card.
* An appropriate zip file software application is necessary to open
these types of files.
Windows ME, Windows 2000 (SP3 or above), or XP System
Note: Do not connect the reader before turning the machine on!
EDGE USB 9-in-1 Readers use ‘Mass Storage Compliant’ technology.
This means that users running Windows ME, Windows 2000 (SP3
or above), or XP are not required to install any device drivers to
operate the reader. Follow the installation steps listed below:
1. Connect the Reader’s USB plug to the USB port on the PC or USB
Hub.
2. The Operating System should then automatically install all needed
drivers without further prompting.
3. The USB 3 Port Hub Plus 9-in-1 Reader should now show up in “My
Computer” as four additional removable drives, one for each port on
the reader.
4. When inserted into the reader, any digital media card(s) may now
be used as portable storage devices, accessible through standard
file access methods.
Note: Prior to removing the digital media card from the reader,
the card must be disconnected. Failure to do so may cause data
corruption and render the card unusable.
To disconnect the card, proceed with either of the following steps:
A. Double-click the “My Computer” icon on the desktop. Right-click
on the appropriate removable disk icon and select the “Eject” option.
Wait for the disconnect confirmation prior to removing the card.
B. Left-click on the PC card with the green arrow in the system tray.
On the pop-up menu, highlight the appropriate card to remove, and
then select “Stop USB Mass Storage Device.” Wait for the disconnect
confirmation prior to removing the card.Installation on Macintosh
Systems. (No driver is required for OS 10.1.2 or greater)
Macintosh Systems
Note: Do not connect the reader before turning the machine on!
It is strongly recommended to use Mac OS 9 or greater when operating
the EDGE USB 2.0 3-Port Hub Plus 9-in-1 Reader. Computers running
Mac OS versions between 8.6 and 9.0 must first update their OS with
Apple’s USB Adapter Card Support for Mass Storage devices before
using USB devices.
For Mac OS 9.x
1. Download the driver from our website at www.edgememory.com/
support/downloads. Choose product and download the Apple OS 9.x
file.
2. Double-click the “Installer” file (USBCardReader) and follow the
onscreen instructions.
3. When the installation is complete, restart the computer.
4. Once the system reboots, connect the USB 2.0 3-Port Hub Plus 9-
in-1 Reader to the computer with the supplied cable and insert digital
media card(s).
5. For each card inserted, the computer will show a new drive icon on
the desktop.
6. The digital media card may now be used as a portable storage
device, accessible through standard file access methods.
Note: Before you remove the digital media card from the reader,
the card must be disconnected. Failure to do so may cause data
corruption and render the card unusable.
To remove the card, proceed with either of the following steps:
A. Click and drag the new disk icon(s) to the trash.
B. Use the “Control” button and click “Eject”.
Installation on Linux Systems 2.4 or Higher
1. Plug the device into the USB port of the computer.
2. Execute cd /etc/sysconfig ( cat /etc/sysconfig/hwconf I more).
3. Check the device information hwconf; write down the mount point.
4. Make a directory in /mnt (ex: mkdir /mnt/usb).
5. Execute a mount /dev/sda* /mnt/usb (if mount point was .dev/sda).
Supported Card Formats:
CompactFlash® Type I and II IBM Microdrive™
SD Memory Card™ MultiMedia(MMC) Card™
Memory Stick™ Memory Stick PRO™
Memory Stick DUO™ SmartMedia™
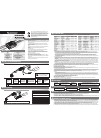
Hardware Installation (No Driver Required for 3-port Hub)
1. Plug in the AC power adapter to power jack (No external power
required under 100mA).
2. Plug in Mini USB connector to device.
3. Plug in A-type connector to USB port of PC.
4. Connect 2.0 devices through the 3-port hub (LED indicators will
illuminate in green when connected properly).
Power Adapter Specification
Input: 100-240V ~,50-60Hz, 0.5A
Output: 5V 2.6A 13.0W
Recommended:
MI-D2700G, YZF-R1 2007, WMR300 Series, 1K
ProCurve 9304M, LKS-SG5P, ETM-IES-05-U1-A, MFR-1000, T171
-
Copyright ©2014 EtherWAN Systems, Inc. Page 1 All Rights Reserved EX29000 rev. 1.0 12/29/2014 1 Unpacking Unpack the items. Your package should include: One EX29000 Series switch Rack-mounting hardware brackets One CD containing this user’s guide If items are ...
Model & Doc Type: EX29000 2
-
PowerView® reference guideInstalling a hub 6.1 Connect the Hub to your home network router6.2 Connect the Hub to your power outlet6.3 Check the range of the HubYour Hub should be able to reach each shade in thehouse.Use your remote from the same location as your Hubto ...
Model & Doc Type: PowerView 22
-
1©2003 D-Link Systems, Inc. All rights reserved. Trademarks or registered trademarks are the property of their respective holders. Software and specifications subject to change without notice. DP-301U 02142003If any of the above items are missing, please contact your reseller.CD-ROM(So ...
Model & Doc Type: DP-301U 10
-
LED PEFCWireless LAN quick connection (WPS)WLAN-Schnellverbindung (WPS) Connexion sans fil rapide (WPS)Conexión inalámbrica rápida (WPS)Connessione rapida wireless (WPS)Connect computers Computer anschließenComment connecter vos ordinateursConectar ordenadoresCollegamento ...
Model & Doc Type: Fritz!Box 7490 2
Operating Impressions, Questions and Answers: