AUDIOVOX ACCESSORIES CORP. (the Company) warrants to the original retail purchaser of this product that should this
product or any part thereof, under normal use and conditions, be proven defective in material or workmanship within 12
months from the date of original purchase, such defect(s) will be repaired or replaced with reconditioned product (at the
Company’s option) without charge for parts and repair labor.
To obtain repair or replacement within the terms of this Warranty, the product is to be delivered with proof of warranty
coverage (e.g. dated bill of sale), speci cation of defect(s), transportation prepaid, to the Company at the address shown
in the User Manual.
This Warranty does not extend to the elimination of externally generated static or noise, to correction of antenna
problems, loss/interruptions of broadcast or internet service, to costs incurred for installation, removal or reinstallation of
product, to corruptions caused by computer viruses, spyware or other malware, to loss of media, les, data or content, or
to damage to tapes, discs, removable memory devices or cards, speakers, accessories, computers, computer peripherals,
other media players, home networks or vehicle electrical systems.
This Warranty does not apply to any product or part thereof which, in the opinion of the Company, has su ered or been
damaged through alteration, improper installation, mishandling, misuse, neglect, accident, or by removal or defacement
of the factory serial number/bar code label(s). THE EXTENT OF THE COMPANY’S LIABILIT Y UNDER THIS WARRANTY IS
LIMITED TO THE REPAIR OR REPLACEMENT PROVIDED ABOVE AND, IN NO EVENT, SHALL THE COMPANY’S LIABILITY
EXCEED THE PURCHASE PRICE PAID BY PURCHASER FOR THE PRODUCT.
This Warranty is in lieu of all other express warranties or liabilities. ANY IMPLIED WARRANTIES, INCLUDING ANY IMPLIED
WARRANTY OF MERCHANTABILITY, SHALL BE LIMITED TO THE DURATION OF THIS WRITTEN WARRANTY. ANY ACTION
FOR BREACH OF ANY WARRANTY HEREUNDER INCLUDING ANY IMPLIED WARRANTY OF MERCHANTABILIT Y MUST BE
BROUGHT WITHIN A PERIOD OF 24 MONTHS FROM DATE OF ORIGINAL PURCHASE. IN NO CASE SHALL THE COMPANY
BE LIABLE FOR ANY CONSEQUENTIAL OR INCIDENTAL DAMAGES FOR BREACH OF THIS OR ANY OTHER WARRANTY.
No person or representative is authorized to assume for the Company any liability other than expressed herein in
connection with the sale of this product.
Some states do not allow limitations on how long an implied warranty lasts or
the exclusion or limitation of incidental or consequential damage so the above
limitations or exclusions may not apply to you. This Warranty gives you speci c legal
rights and you may also have other rights which vary from state to state.
Connect the camcorder to your PC with the provided USB cable.
To install Memory Manager 3
Windows: To access the Memory Manager 3 installer, go to My Computer (XP users) /go to
Computer (Vista and 7 users) in the Start menu, find and open the drive letter associated
with the CD rom and then double-click the MemoryMgr3_Windows_Installer.exe file to
launch the installer. The RCA Detective application is installed with Memory
Manager 3 and will automatically run the Memory Manager 3 application when your
camcorder is connected to the PC.
Mac: To access the Memory Manager 3 installer, double-click the CD rom volume.
Double-click the RCAMacInstallers.dmg disk image in the CD rom volume. Locate
the RCAMacInstallers volume on the desktop and Double-click on it. Double-click the
MemoryMgr3 Mac Installer file in the RCAMacInstallers volume to start the installation.
After the Memory Manager 3 installation has completed, double-click the RCA Detective
Installer file in the RCAMacInstallers volume to install the RCA Detective application, which
will automatically run the Memory Manager 3 application when your camcorder is connected
to the Mac.
Branchez le caméscope à votre ordinateur à l’aide du câble USB fourni.
Pour installer Memory Manager 3
Windows: Pour accéder à l’installateur de Memory Manager 3, ouvrez Mon Ordinateur
(utilisateurs de XP)/Ordinateur (utilisateurs de Vista et Windows 7) dans le menu Démarrer;
trouvez et ouvrez la lettre de lecteur associée au CD-ROM puis double-cliquez sur le fichier
MemoryMgr3_Windows_Installer.exe pour démarrer l’installateur. Le logiciel RCA Detective
est installé en même temps que Memory Manager 3 et démarre automatiquement le logiciel
Memory Manager 3 lorsque vous branchez votre caméscope à l’ordinateur.
Mac: Pour accéder à l’installateur de Memory Manager 3, double-cliquez sur le volume du
CD-ROM. Double-cliquez sur l’image de disque RCAMacInstallers.dmg dans le volume du
CD-ROM. Trouvez le volume RCAMacInstallers sur le bureau et double-cliquez sur lui.
Double-cliquez sur le fichier MemoryMgr3 Mac Installer dans le volume RCAMacInstallers
pour démarrer l’installation. Après que l’installation de Memory Manager 3 est terminée,
double-cliquez sur le fichier RCA Detective Installer dans le volume RCAMacInstallers pour
installer le logiciel RCA Detective, qui démarre automatiquement le logiciel Memory Manager
3 lorsque vous branchez votre caméscope à votre Mac.
Lift up the cover
Soulevez le
couvercle
EZ2050 Series RCA Small Wonder Camcorder
www.rcaaudiovideo.com
Congratulations on purchasing your new RCA Small Wonder Camcorder.
Please read these instructions for quick tips on using the product.
The User Manual PDF le can also be found in the CD ROM under the User Manuals folder.
v1.0 (1.0.1.0) (EN/F/E)
QuickStartGuide
1. Content of the box
1. Contenu de la boîte
• Small Wonder Camcorder
• AAA batteries x 4
• USB cable
• AV cable
• CD-ROM
• Lanyard
• Soft pouch
• Quick Start Guide
• Caméscope Small Wonder
• 4 piles AAA
• Câble USB
• Câble AV
• CD-ROM
• Dragonne
• Étui
• Guide de démarrage rapide
2. Battery Installation
2. Installation de la pile
11. Learning more about the camcorder
11. En savoir plus sur le caméscope
Read the user manual for more information on the followings:
• Using the MENU button to setup the camcorder (including date
and time)
• Viewing videos on TV
• Recording videos to VHS tape or DVD
• Connecting the camcorder to your PC
• Tips and troubleshooting
• Safety and warranty information
Lisez le guide de l’utilisateur pour plus de renseignements sur les points suivants :
• Utilisation du bouton MENU pour con gurer le caméscope (incluant la date et l’heure)
• Visionnement de vidéos sur un téléviseur
• Enregistrement de vidéos sur une cassette VHS ou un DVD
• Branchement du caméscope à votre ordinateur
• Conseils et dépannage
• Précautions et renseignements sur la garantie
3. General controls
3. Commandes générales
Lens
Lentille
Recording indicator
Indicateur
d’enregistrement
Microphone
Microphone
SD card slot
Fente pour
carte SD
Camcorder strap hole
Trou pour la
dragonne du
caméscope
MODE
MODE
On/o switch
Commutateur
on/o
Delete recordings
Suppression
d’enregistrements
Switch between Video
or Photo mode
Basculement entre les
modes Vidéo et Photo
AV output
Sortie AV
Play/pause
Lecture/pause
Setup menu
Menu
Con guration
Record
Enregistrement
Audio speaker
Haut-parleur
LCD screen
A chage
ACL
USB
USB
+/– – Adjust volume
during playback/
zoom during record
and preview
/ – Skip to
previous or next
recording ; fast
rewind or forward
+/– – Réglage du
volume pendant
la lecture/
zoom pendant
l’enregistrement ou
l’aperçu
/ – Saut à
l’enregistrement
précédent ou suivant
7. Video recording and photo taking
7. Enregistrement vidéo et prise de photo
MODE
MODE
1
2
3
4
5
1
2
3
4
5
Start, stop, resume recording in Video mode; enter Video
mode from other modes
Pause and resume recording
Zoom in during recording
Zoom out during recording
Switch between Video or Photo mode
Démarrage, arrêt, reprise de l’enregistrement en mode
Vidéo; passage au mode Vidéo à partir des autres modes
Suspension et reprise de l’enregistrement
Zoom avant pendant l’enregistrement
Zoom arrière pendant l’enregistrement
Basculement entre les modes Vidéo et Photo
1
1
2
2
3
3
4
4
5
5
3
Actual recording time and capacity will vary depending on type of video content being recorded, system requirements,
and other factors.
3
La durée réelle d’enregistrement dépend du type de contenu vidéo enregistré, des exigences du système et d’autres facteurs.
Video recording indicator
Indicateur d’enregistrement vidéo
9. Installing RCA Memory Manager application
9. Installation du logiciel RCA Memory Manager
8. Playing back or deleting recordings
8. Lecture ou suppression d’enregistrements
1
1
2
2
3
3
5
5
4
4
1
2
3
4
5
6
7
1
2
3
4
5
6
7
Enter Playback mode to play the most recent recording;
start or pause playback
Adjust volume during playback
Cue to previous recording
Cue to next recording
Stop playback or enter Video mode from Playback mode
Press to select delete one or all recordings.
When video playback stop, enter Video mode from
Playback mode
Passage en mode Lecture pour visionner le plus récent
enregistrement; démarrage ou suspension de la lecture
Réglage du volume pendant la lecture
Saut à l’enregistrement précédent
Saut à l’enregistrement suivant
Arrêt de la lecture ou passage au mode Vidéo à partir du
mode Lecture
Appuyez pour sélectionner la suppression d’un ou de tous
les enregistrements.
Lorsque la lecture est arrêtée, passage au mode Vidéo à
partir du mode Lecture
6
6
7
7
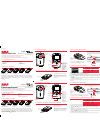
6. Selecting recording quality
6. Sélection de la qualité d’enregistrement
Settings
HD
HQ
WebQ
Réglages
HD
HQ
WebQ
Resolutions (pixel) &
Frame Rates (FPS)
1280 x 720 @ 30fps
720 x 480 @ 30fps
320 x 240 @ 30fps
Résolution (pixels) et
Images par seconde (IPS)
1280 x 720 à 30 IPS
720 x 480 à 30 IPS
320 x 240 à 30 IPS
Approx. recording durations
on a 32 GB memory card
3
4 hours
6 hours
17 hours
Durées d’enregistrement approx. avec
une carte-mémoire de 32 Go
3
4 heures
6 heures
17 heures
5. Turning on the camcorder
5. Démarrage du caméscope
The camcorder has three operation modes (Video, Photo
and Playback). It is always in Video mode after switched on.
Refer to the diagram below for switching between modes.
Le caméscope possède trois modes de fonctionnement (Vidéo, Photo
et Lecture). Il passe toujours en mode Vidéo lorsqu’il est démarré.
Consultez le diagramme ci-dessous pour basculer entre les modes.
4. Inserting (or removing) memory card
4. Insertion (ou retrait) d’une carte-mémoire
A SD memory card (not included) is recommended for recording.
Une carte-mémoire SD (non fournie) est recommandée pour l’enregistrement.
1. In Video mode, press MENU to show the camcorder menu.
2. Press + or - to select Quality.
3. Press RECORD to enter and press + or – to select from HD, HQ and WebQ.
4. Press RECORD to save settings.
5. Press MENU to exit the camcorder menu. The selected setting (HD, HQ or WebQ) appears on
the display screen during preview.
1. En mode Vidéo, appuyez sur MENU pour a cher le menu du caméscope.
2. Appuyez sur + ou – pour sélectionner « Qualité ».
3. Appuyez sur RECORD
pour l’ouvrir puis appuyez sur + ou – pour sélectionner HD, HQ ou
WebQ.
4. Appuyez sur RECORD pour sauvegarder le réglage.
5. Appuyez sur MENU pour fermer le menu du caméscope. Le réglage sélectionné (HD, HQ
ou WebQ) apparaît sur l’affichage pendant l’aperçu.
To insert card: Push the card in until a click is heard
To remove card: Push card in until a click is heard,
then slowly release the card. As card is under minimal
tension when locked in memory slot, please use care
when removing.
Pour insérer la carte : Poussez sur la carte jusqu’à ce
que vous entendiez un « clic »
Pour retirer la carte : Poussez sur la carte jusqu’à ce
que vous entendiez un « clic », puis relâchez lentement
la carte. Étant donné que la carte est faiblement retenue
lorsqu’elle est dans la fente, faites attention lorsque
vous la retirez.
To ensure that videos can be managed and played on your PC:
• Make sure to install the included Memory Manager application.
Pour vous assurer que les vidéos peuvent être gérées et lues sur votre ordinateur :
• Assurez-vous d’installer le logiciel Memory Manager fourni.
1
2
3
4
1
2
3
4
Switch on
Démarrage
Press MODE
Appuyez sur MODE
Press MODE
Appuyez sur MODE
Press PLAY/PAUSE
Appuyez sur PLAY/
PAUS E
Playback mode
Mode Lecture
When video playback
stop, press MODE or
RECORD
(Press
RECORD
to stop video
playback)
Lorsque la lecture vidéo
s’arrête, appuyez sur
MODE ou RECORD
(appuyez sur RECORD
pour arrêter la lecture
vidéo)
Video mode
1
Mode Video
1
Photo mode
2
Mode Photo
2
1
In Video mode, press RECORD to record a video
2
In Photo mode, press RECORD to record a photo
1
En mode Vidéo, appuyez sur RECORD pour enregistrer une vidéo
2
En mode Photo, appuyez sur RECORD pour prendre une photo
Push (to the right) to
unlock.
Appuyez (vers la droite)
pour déverrouiller.
Observe the polarities.
Respectez les
polarités.
Glissez vers le haut
pour verrouiller.
Slide up to lock.
Caméscope RCA Small Wonder Séries EZ2050
www.rcaaudiovideo.com
Félicitations pour l’achat de votre nouveau caméscope Small Wonder de RCA.
Veuillez lire ces instructions pour des conseils sur l’utilisation de cet appareil.
Le chier PDF du guide de l’utilisateur se trouve aussi sur le CD-ROM, dans le répertoire « User Manuals ».
DémarrageRapide
Guide de
Français
English
The camcorder can also be powered by USB. Refer to Connecting to a PC section for connecting
details. When the camcorder is connected to a PC, three options will be displayed: USB connect,
Web cam and USB power. Press + or - to select USB power and press RECORD
to con rm.
Le caméscope peut aussi être alimenté par USB. Consultez la rubrique « Branchement à un
ordinateur » pour des renseignements sur le branchement. Lorsque le caméscope est branché
à un ordinateur, trois options s’a chent : Branchement USB, Caméra Web et Alimentation par
USB. Appuyez sur + ou - pour sélectionner « Alimentation par USB » puis appuyez sur
RECORD
pour con rmer.
MODE
MODE
Product registration
Thank you for purchasing an RCA product. We pride ourselves on the quality and
reliability of all our electronic products but if you ever need service or have a question, our
customer service sta stands ready to help. Contact us at www.rcaaudiovideo.com
PURCHASE REGISTRATION: Registering On-line will allow us to contact you in the
unlikely event a safety noti cation is required under the Federal Consumer Safety Act.
Register Online at:
WWW.RCAAUDIOVIDEO.COM
Click on Product Registration and Fill Out the Brief Questionnaire
© 2011 Audiovox Accessories Corporation
111 Congressional Blvd., Suite 350
Carmel, IN 46032
Trademark Registered
Printed in China
Visit http://store.audiovox.com to find
the best accessories for your products.
12 Month Limited Warranty
Applies to RCA Camcorders
To use the camcorder as a Web Camera in your PC, a driver le is needed. Please go to
www.rcaaudiovideo.com to download the le.
After downloading the driver le, follow the instructions and complete the installation.
Connect the camcorder to the PC, after the camcorder displays the selection menu, select the
Web Cam option and press RECORD . Now the camcorder is connected as Web Camera to the
PC.
Pour utiliser le caméscope comme caméra Web avec votre ordinateur, un chier pilote est
nécessaire. Veuillez visiter www.rcaaudiovideo.com pour télécharger le chier.
Après avoir téléchargé le chier pilote, suivez les instructions et complétez l’installation.
Branchez le caméscope à l’ordinateur; lorsque le caméscope a che le menu de sélection,
sélectionnez l’option « Caméra Web » puis appuyez sur RECORD
. NLe caméscope est
maintenant branché à l’ordinateur comme caméra Web.
10. Using camcorder as Web Camera in PC
10. Utilisation du caméscope comme caméra Web de l’ordinateur
AUDIOVOX ACCESSORIES CORP. (la Compagnie) garantie au premier acheteur au détail de ce produit que si ce produit
ou toute pièce de ce dernier, pour une utilisation et dans des conditions normales, révèle un défaut matériel ou de main
d’oeuvre dans les douze (12) mois suivants la date du premier achat, un tel défaut sera réparé ou remplacé par un produit
remis en état (au choix de la Compagnie) sans frais pour les pièces et la main d’œuvre.
Pour obtenir une réparation ou un remplacement selon les conditions de cette Garantie, le produit doit être envoyé avec
une preuve de garantie (p. ex., une facture datée de l’achat), des renseignements sur le(s) défaut(s) et le port prépayé à la
Compagnie à l’adresse indiquée dans le guide de l’utilisateur.
Cette Garantie ne couvre pas l’élimination des bruits ou parasites externes, la solution de problèmes d’antenne, la
perte/l’interruption de transmissions ou de l’accès à Internet, les coûts de l’installation, du retrait ou de la réinstallation
du produit, les altérations causées par un virus informatique, un logiciel espion ou autre programme malveillant, la perte
de médias, de chiers, de données ou de contenus, les dommages à des cassettes, des disques, des dispositifs ou des
cartes-mémoire amovibles, des haut-parleurs, des accessoires, des ordinateurs, des périphériques d’ordinateurs, d’autres
lecteurs multimédias, des réseaux résidentiels ou des systèmes électriques de véhicule.
Cette Garantie ne s’applique pas au produit ou à toute pièce de ce dernier qui, selon la Compagnie, a été endommagé
par ou a sou ert d’une modi cation, d’une installation incorrecte, d’une manutention incorrecte, d’un abus, de
négligence, d’un accident ou dont l’étiquette portant le numéro de série/le code à barres usiné a été retirée ou
dégradée. L’ÉTENDUE DE L’OBLIGATION DE LA COMPAGNIE SOUS CETTE GARANTIE SE LIMITE À LA RÉPARATION OU AU
REMPLACEMENT INDIQUÉ CI-DESSUS; L’OBLIGATION DE LA COMPAGNIE NE DOIT EN AUCUN CAS DÉPASSER LE PRIX
D’ACHAT PAYÉ PAR L’ACHETEUR POUR CE PRODUIT.
Cette Garantie remplace toutes les autres garanties ou obligations explicites. TOUTE GARANTIE IMPLICITE, INCLUANT
LA GARANTIE IMPLICITE DE QUALITÉ MARCHANDE, DOIT ÊTRE LIMITÉE À LA DURÉE DE LA PRÉSENTE GARANTIE ÉCRITE.
TOUTE ACTION POUR UNE CONTRAVENTION AUX TERMES DE LA PRÉSENTE GARANTIE, INCLUANT LA GARANTIE
IMPLICITE DE QUALITÉ MARCHANDE, DOIT ÊTRE ENTREPRISE DANS UNE PÉRIODE
DE VINGT-QUATRE (24) MOIS À PARTIR DE LA DATE ORIGINALE DE L’ACHAT.
LA COMPAGNIE NE DEVRA EN AUCUN CAS Ê TRE TENUE RESPONSABLE DES
DOMMAGES INDIRECTS OU ACCESSOIRES SUITE À LA VIOLATION DE CET TE OU DE
TOUTE AUTRE GARANTIE. Aucune personne et aucun représentant n’est autorisé à
assumer au nom de la Compagnie toute obligation autre que celles indiquées dans
la présente en lien avec la vente de ce produit.
Certaines provinces ne permettent pas les limites à la durée des garanties implicites
ou l’exclusion des dommages indirects ou accessoires, alors certaines limites ou
exclusions ci-dessus pourraient ne pas s’appliquer à vous. Cette Garantie vous
donne certains droits spéci ques et vous pourriez avoir d’autres droits, qui varient
selon la province.
Enregistrement du produit
Merci d’avoir acheté un produit RCA. Nous sommes ers de la qualité et de la abilité de
tous nos produits électroniques, mais en cas de nécessité de réparation ou pour toute
question, le personnel de notre service clientèle est prêt à vous aider. Contactez-nous sur
www.rcaaudiovideo.com
ENREGISTREMENT D’ACHAT: Enregistrer votre produit en ligne nous permettra de
communiquer avec vous pour tout avis de sécurité au sujet du produit en vertu du Federal
Consumer Safety Act (Loi fédérale de protection du consommateur).
Enregistrez votre produit en ligne sur::
WWW.RCAAUDIOVIDEO.COM
Cliquez sur Enregistrement produit et remplissez le court questionnaire
Garantie limitée de 12 mois
S’applique aux caméscopes de RCA
© 2011 Audiovox Accessories Corporation
111 Congressional Blvd., Suite 350
Carmel, IN 46032
Marque(s) ® Deposée(s)
Imprimé en Chine
Visitez http://store.audiovox.com pour trouver
les meilleurs accessoires pour vos appareils.
Appuyez sur
Slide and
hold until the
camcorder turns
on or o
Glissez et
maintenez
jusqu’à ce que
le caméscope
démarre ou se
ferme