user manual
guide de l’utilisateur
RC40
RC40R
v2.0 (1.0.2.0) (EN/F)
Before you beginFCC Information
Clock
EN/F
It is important to read this user manual prior to using your new product for the fi rst time.
Nous vous recommandons de lire ce manuel d’instructions avant d’utiliser votre
nouveau produit pour la première fois.
MHz
AM
PM
AM
FM
kHz
AUX
Plugging in for power
AC OUTLET POWER SUPPLY: 120V~60Hz
Refer to the “Clock” section and
follow the instructions to get the
clock time shown correctly with the
Auto Clock set feature.
Battery back-up operation
• This clock radio is equipped with
a memory holding system that can
be powered with 2 “AA” batteries
(included). The power failure
protection circuit will not operate
unless battery is installed.
• When normal household power
is interrupted, or AC line cord
is unplugged, the batteries will
power the clock radio to keep
track of time and alarm settings
programmed into memory.
• When the battery backup functions,
the digital display will not light,
however, the function of alarm
still occurs during the power
interruption if remaining battery
power is adequate.
• Normal operation will resume after
AC power is restored so you will not
have to reset the time or the alarm.
To install batteries:
1. Remove battery compartment door
(located at the bottom of the radio)
by applying thumb pressure to the
tab on battery door and then lift
the door out and off the cabinet.
FCC Information
Note: This equipment has been tested
and found to comply with the limits
for a Class B digital device, pursuant
to Part 15 of FCC Rules. These limits
are designed to provide reasonable
protection against harmful interference
in a residential installation. This
equipment generates, uses, and can
radiate radio frequency energy and, if
not installed and used in accordance
with the instructions, may cause harmful
interference to radio communications.
However, there is no guarantee
that interference will not occur in a
particular installation. If this equipment
does cause harmful interference to
radio or television reception, which
can be determined by turning the
equipment off and on, the user is
encouraged to try to correct the
interference by one or more of the
following measures:
• Reorient or relocate the receiving
antenna.
• Increase the separation between the
equipment and receiver.
• Connect the equipment into an
outlet on a circuit different from
that to which the receiver is
connected.
• Consult the dealer or an
experienced radio/TV technician for
help.
2. Insert 2 AA batteries (included).
3. Replace the compartment door.
Note: we recommend that you replace
the batteries every year.
Power failure indicator
When AC power is interrupted
(disconnected) for a short period of
time, both time and alarm settings
will change (unless batteries are
installed). After AC power is restored
(reconnected), the Digital Display
will blink to indicate that power was
interrupted and you should readjust the
time and alarm settings.
Power is fed to the unit even
when it is not functioning. To
cut the power supply off, the
power cable must be unplugged.
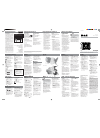
Front view
SNOOZE – enter snooze mode where
the alarm will quiet but sound again
once the snooze period is over.
RADIO – turn on the radio.
REV – set clock or wake time
(decrease value).
FWD – set clock or wake time
(increase value).
OFF – turn off the unit.
CHECK WAKE TIME – check the
currently set wake time.
–VOLUME+ – adjust volume.
TUNING – select radio frequencies.
General controls
Back view
BRIGHTNESS – select display
brightness (high or low).
DST – turn daylight saving function on
or off.
TIME ZONE – press repeatedly to select
a time zone
BAND – select between AM and FM
bands.
Top view
SLEEP – activate sleep function.
/WAKE1/WAKE2/ – slide switch to
set Wake 1, Wake 2 and clock time.
WAKE –
OFF – activate and set
wake function.
MHz
AM
PM
AM
FM
kHz
AUX
Setting clock manually
1. Slide the switch /WAKE1/
WAKE2/ on the top of the unit
to clock
position.
2. Press
REV or FWD to set the
clock time. The time decrements or
increments will follow by a faster
rate when you press and hold the
buttons.
• The “:” between hour and minute
time fl ashes when you are setting
the time. AM or PM icon will also
show beside the time.
3. Slide the switch /WAKE1/
WAKE2/ on the top of the unit
to lock position when fi nished.
US time zones
Auto clock set
You do not have to set the clock time as
a built-in automatic time set system is
equipped in this clock powered by 2 AA
batteries (included and installed).
To set the clock time correctly:
1. Plug for power
• Insert the plug of the
unit into an AC power
outlet.
2. Select daylight saving
• Slide the DST switch at the
back of the unit to turn on/
off in areas observing/not
observing such time change.
3. Select your time zone
• Press TIME ZONE
repeatedly at the
back of the unit to
cycle through the
time zones (EST > CST
> MST > PST > AKST > HST > AST
> EST...). The default time zone is
Eastern (EST) (refer to the maps on
the right).
Your clock is now set and ready
for use.
WARNING: Please avoid playing with
these buttons after entering the Clock/
Alarm set mode.
Washington
Oregon
Arizona
New Mexico
Texas
Oklahoma
Kansas
Colorado
Utah
Nevada
California
Idaho
Montana
North Dakota
Nebraska
Minnesota
Iowa
Missouri
Arkansas
Mississippi
Alabama
Louisiana
Florida
Georgia
Wisconsin
Illinois
Indiana
Ohio
Michigan
New Jersey
New York
Conn.
R.I.
Mass.
N.H.
Maine
Wyoming
Pennsylvania
Virginia
Virginia
West
Delaware
Md.
Vt.
Carolina
North Carolina
South
Olympia
Boise
Helena
Salt Lake City
Pierre
Cheyenne
Lincoln
St. Paul
Des Moines
Madison
Lansing
Harrisburg
Trenton
Providence
Hartford
Concord
Albany
Montpelier
Augusta
Carson City
Phoenix
Santa Fe
Denver
Oklahoma City
Austin
Jefferson City
Little Rock
Jackson
Springfield
Indianapolis
Montgomery
Columbus
Charleston
Columbia
Atlanta
Richmond
Raleigh
Annapolis
Boston
Washington, D.C.
Topeka
New York
Chicago
Miami
Philadelphia
Detroit
Houston
Dallas
Seattle
Las Vegas
Los Angeles
San Francisco
Sacramento
Memphis
New Orleans
St. Louis
Baton
Rouge
Salem
Bismarck
South Dakota
Tennessee
Kentucky
Nashville
Frankfort
Pacific Mountain Central Eastern
Summer
Winter
Winnipeg
Saskatoon
Regina
Yukon
Territory
Alberta
Saskatchewan
Manitoba
Ontario
British
Columbia
Quebec
Newfoundland
Northwest Territories
Nunavut
Pacific Atlantic
Hawaii-
Aleutian
Alaska
Mountain Central Eastern
Summer Winter
Atlantic
Puerto Rico
(AST)
(EST)(CST)(MST)
(PST)
(HST)
(AKST)
(AST)
(EST)(CST)(MST)(PST)
Canadian time zones
Radio
Selecting radio mode
Press RADIO to switch on radio.
Switching band
Slide the BAND switch on the back of
the unit to select FM or AM band.
Tuning the radio
Rotate the TUNING knob on the
right of the unit to adjust the radio
frequency that shows on the large
display.
Built-in AFC
The Built In Automatic Frequency
Control (AFC) works only on FM. It helps
reducing drift on FM reception and
keeping the radio locked in on the FM
station to which it is tuned.
When tuning in FM stations, you may
notice that the station you are tuning
can be well-tuned on two or three
nearby points on the dial. Always tune
carefully at the loudest and clearest
point.
AM antenna
A built-in ferrite rod antenna eliminates
the need for an outside antenna for
AM reception. Rotating the unit slightly
may improve reception of distant AM
stations.
Brightness control
Slide BRIGHTNESS switch on the back
of the unit to Hi (high) or Lo (low)
position to adjust the brightness of all
the displays at the front of the unit.
Setting wake time
This unit allows two wake times to
be set.
1. Slide the switch
/WAKE1/
WAKE2/
on the top of the unit
to WAKE 1 or WAKE 2 position.
2. Press
REV or FWD to set the
respective wake time. The time
decrements or increments will
follow by a faster rate when you
press and hold the buttons.
• The wake time, corresponding wake
timer indicator (WK-1 for WAKE 1
and WK-2 for WAKE 2) and AM/
PM time indicator fl ash on the small
display.
3. Slide the switch /WAKE1/
WAKE2/
on the top of the unit
to position when fi nished.
Selecting wake source
You may be woken up by radio or
alarm.
1. Select an AM or FM station (see
directions on “Radio”).
2. Set a wake time (see above
direction).
3. Press WAKE –
OFF 1 or 2
repeatedly on the top of the unit to
select a waking mode.
• Corresponding icon lights on the
large display.
Turning off the wake
alarm or radio
• To silence the wake function
momentarily:
To turn off the wake function, press
SNOOZE on the top of the unit.
The wake alarm or radio will be
switched off temporarily. The alarm
or radio will be on again when the
snooze period (default: 9 minutes) is
over. (read “SmartSnooze
TM
”)
• To turn off the wake alarm or
radio:
Press OFF. The wake alarm or radio
will activate again the next day
unless you switch off the Wake
function.
• To disable the wake function
completely:
Press WAKE –
OFF 1 or 2
repeatedly on the top of the unit
until no wake mode icon (1 , 1
or 2 , 2 ) shows on the large
display.
1
– Wake 1 by alarm
1
– Wake 1 by radio
2 – Wake 2 by alarm
2 – Wake 2 by radio
• The unit equips with GRAD-U-
WAKE feature, the alarm tone
volume will increase gradually to
its maximum in about 30 to 45
seconds.
Checking wake time
• Press CHECK WAKE TIME
repeatedly to show the currently set
wake time 1 and 2.
• The wake time, corresponding wake
timer indicator (WK-1 for WAKE 1
and WK-2 for WAKE 2) and AM/
PM time indicator show on the
small display.
• If corresponding wake function is
not activated, OFF shows on the
small display.
Wake function
SmartSnooze
TM
This operation allows extra sleep time
after the wake function is on. The alarm
will be off by pressing SNOOZE, SLEEP,
WAKE –
OFF 1, or 2 until the
snooze period is over. Snooze function
can be used repeatedly up to 60
minutes. After this, the wake function
will turn off until the next day.
To set the “quiet” period:
1. Press and hold SNOOZE.
2. Press
REV or FWD to set the
quiet period that shows on the
large display. The time decrements
or increments will follow by a faster
rate when you press and hold the
buttons.
• Snooze period can be set from 1 to
30 minutes (default: 9 minutes).
3. Release SNOOZE.
SmartSnooze
TM
is only
available when
/WAKE1/WAKE2/ is at
the lock
position.
In sleep mode, you can set the duration
(up to 90 minutes) before the radio turn
off automatically.
To set the sleep mode:
• Press SLEEP repeatedly to cycle
among the sleep times available
(90min, 60min, 30min, 15min and
OFF. 90min is the default setting) on
the large display.
• The radio will be switched on.
To check the remaining time in
sleep mode:
• Press and hold SLEEP to check the
remaining sleep time on the large
display.
To cancel the sleep mode:
• If you decide to turn off the unit
sooner, press SNOOZE or OFF.
Sleep function
Warranty information
12 Month Limited Warranty
Applies to RCA Audio/Video
Products
AUDIOVOX ELECTRONICS CORP. (the
Company) warrants to the original retail
purchaser of this product that should
this product or any part thereof, under
normal use and conditions, be proven
defective in material or workmanship
within 12 months from the date of
original purchase, such defect(s) will be
repaired or replaced with reconditioned
product (at the Company’s option)
without charge for parts and repair
labor.
To obtain repair or replacement
within the terms of this Warranty, the
product is to be delivered with proof
of warranty coverage (e.g. dated bill
of sale), specifi cation of defect(s),
transportation prepaid, to the Company
at the address shown below.
This Warranty does not extend to the
elimination of externally generated
static or noise, to correction of
antenna problems, loss/interruptions of
broadcast or internet service, to costs
incurred for installation, removal or
reinstallation of product, to corruptions
caused by computer viruses, spyware or
other malware, to loss of media, fi les,
data or content, or to damage to tapes,
discs, removable memory devices or
cards, speakers, accessories, computers,
computer peripherals, other media
players, home networks or vehicle
electrical systems.
This Warranty does not apply to any
product or part thereof which, in the
opinion of the Company, has suffered
or been damaged through alteration,
improper installation, mishandling,
misuse, neglect, accident, or by removal
or defacement of the factory serial
number/bar code label(s). THE EXTENT
OF THE COMPANY’S LIABILITY UNDER
THIS WARRANTY IS LIMITED TO THE
REPAIR OR REPLACEMENT PROVIDED
ABOVE AND, IN NO EVENT, SHALL THE
COMPANY’S LIABILITY EXCEED THE
PURCHASE PRICE PAID BY PURCHASER
FOR THE PRODUCT.
This Warranty is in lieu of all other
express warranties or liabilities. ANY
IMPLIED WARRANTIES, INCLUDING
ANY IMPLIED WARRANTY OF
MERCHANTABILITY, SHALL BE LIMITED
TO THE DURATION OF THIS WRITTEN
WARRANTY. ANY ACTION FOR BREACH
OF ANY WARRANTY HEREUNDER
INCLUDING ANY IMPLIED WARRANTY
OF MERCHANTABILITY MUST BE
BROUGHT WITHIN A PERIOD OF 24
MONTHS FROM DATE OF ORIGINAL
PURCHASE. IN NO CASE SHALL THE
COMPANY BE LIABLE FOR ANY
CONSEQUENTIAL OR INCIDENTAL
DAMAGES FOR BREACH OF THIS OR
ANY OTHER WARRANTY. No person or
representative is authorized to assume
for the Company any liability other than
expressed herein in connection with the
sale of this product.
Some states do not allow limitations on
how long an implied warranty lasts or
the exclusion or limitation of incidental
or consequential damage so the above
limitations or exclusions may not apply
to you. This Warranty gives you specifi c
legal rights and you may also have
other rights which vary from state to
state.
How to make a warranty claim:
• If your product is capable of storing
content (such as an mp3 player,
digital voice recorder, etc), it is
recommended to make periodic
backup copies of content stored
on the product. If applicable,
before shipping a product, make
a back up copy of content or data
stored on the device. Also, it is
advisable to remove any personal
content which you would not want
exposed to others. IT IS LIKELY
THAT CONTENTS AND DATA ON
THE DEVICE WILL BE LOST DURING
SERVICE AND REFORMATTING.
AUDIOVOX ACCEPTS NO LIABILITY
FOR LOST CONTENT OR DATA,
OR FOR THE SECURITY OF ANY
PERSONAL CONTENT OR DATA ON
THE RETURNED DEVICE. Product
will be returned with factory
default settings, and without any
pre-loaded content which may have
been installed in the originally
purchased products. Consumer will
be responsible for reloading data
and content. Consumer will be
responsible to restore any personal
preference settings.
• Properly pack your unit. Include
any remotes, memory cards, cables,
etc. which were originally provided
with the product. However DO NOT
return any removable batteries,
even if batteries were included
with the original purchase. We
recommend using the original
carton and packing materials.
• Include evidence of purchase date
such as the bill of sale. Also print
your name and address and a
description of the defect. Send via
standard UPS or its equivalent to:
Audiovox Electronics Corp.
Attn: Service Department.
150 Marcus Blvd., Hauppauge
N.Y. 11788
1-877-833-3491
• Insure your shipment for loss or
damage. Audiovox accepts no
liability in case of damage or loss en
route to Audiovox.
• Pay any charges billed to you by
the Exchange Center for service not
covered by the warranty.
• A new or refurbished unit will be
shipped to you freight prepaid.
What we will do:
Provide you with a new, or at our
option, a refurbished unit. The
exchange unit is under warranty for
the remainder of the original product’s
warranty period.
For Canada Customers, please ship
to:
Audiovox Return Centre
c/o Genco
6685 Kennedy Road,
Unit#3, Door 16,
Mississuaga, Ontario
L5T 3A5
Wake function
Large display: Clock time or
radio frequency
Small display: Wake time
Wake 1 mode
Wake 2 mode
Illustrations contained within this
Illustrations contained within this
publication are for representation only
publication are for representation only
and subject to change.
and subject to change.
The descriptions and characteristics
The descriptions and characteristics
given in this document are given as
given in this document are given as
a general indication and not as a
a general indication and not as a
guarantee. In order to provide the
guarantee. In order to provide the
highest quality product possible,
highest quality product possible,
we reserve the right to make any
we reserve the right to make any
improvement or modifi cation without
improvement or modifi cation without
prior notice.
prior notice.
© 2010 Audiovox Accessories Corporation
111 Congressional Blvd., Suite 350
Carmel, IN 46032
Trademark(s) ® Registered
Printed in China
Visit http://store.audiovox.com to find
the best accessories for your products.
IMPORTANT SAFETY INSTRUCTIONS
PLEASE READ AND SAVE THIS FOR FUTURE REFERENCE
Some of the following information may
not apply to your particular product;
however, as with any electronic product,
precautions should be observed during
handling and use.
• Read these instructions.
• Keep these instructions.
• Heed all warnings.
• Follow all instructions.
• Do not use this apparatus near
water.
• Clean only with dry cloth.
• Do not block any ventilation
openings. Install in accordance with
the manufacturer’s instructions.
• Do not install near any heat sources
such as radiators, heat registers,
stoves, or other apparatus (including
amplifi ers) that produce heat.
• Do not defeat the safety purpose
of the polarized or grounding-type
plug. A polarized plug has two
blades with one wider than the
other. A grounding type plug has
two blades and a third grounding
prong. The wide blade or the third
prong is provided for your safety. If
the provided plug does not fi t into
your outlet, consult an electrician
for replacement of the obsolete
outlet.
• Protect the power cord from being
walked on or pinched particularly at
plugs, convenience receptacles, and
the point where they exit from the
apparatus.
• Only use attachments/accessories
specifi ed by the manufacturer.
• Use only with
the cart, stand,
tripod, bracket,
or table
specifi ed by the
manufacturer,
or sold with
the apparatus.
When a cart is used, use caution
when moving the cart/apparatus
combination to avoid injury from
tip-over.
• Unplug this apparatus during
lightning storms or when unused
for long periods of time.
• Refer all servicing to qualifi ed
service personnel. Servicing is
required when the apparatus has
been damaged in any way, such
as power-supply cord or plug is
damaged, liquid has been spilled
or objects have fallen into the
apparatus, the apparatus has been
exposed to rain or moisture, does
not operate normally, or has been
dropped.
ADDITIONAL SAFETY INFORMATION
• Apparatus shall not be exposed to
dripping or splashing and no objects
fi lled with liquids, such as vases,
shall be placed on the apparatus.
• Always leave suffi cient space around
the product for ventilation. Do
not place product in or on a bed,
rug, in a bookcase or cabinet that
may prevent air fl ow through vent
openings.
• Do not place lighted candles,
cigarettes, cigars, etc. on the
product.
• Connect power cord only to AC
power source as marked on the
product.
• Care should be taken so that objects
do not fall into the product.
• Do not attempt to disassemble
the cabinet. This product does
not contain customer serviceable
components.
• The marking information is located
at the bottom of apparatus.
• To be completely disconnect the
power input, the main plug of
apparatus shall be disconnected
from the mains.
• Main plug is a disconnect device.
The main plug should not be
obstructed OR should be easily
accessed during intended use.
• The ventilation should not be
impeded by covering the ventilation
openings with items such as
newspaper, table-cloths, curtains etc.
• No naked fl ame sources such as
lighted candled should be placed on
the apparatus.
• Attention should be drawn to the
environmental aspects of battery
disposal.
• The use of apparatus in moderate
climates.
This is class II
equipment designed
with double or
reinforced insulation
so it does not require
a safety connection to
electrical earth (US:
ground).
Plugging in for power
AC OUTLET POWER SUPPLY:
120 V~60 Hz
The AC power plug is
polarized (one blade is
wider than the other)
and only fi ts into AC
power outlets one
way. If the plug will
not go into the outlet
completely, turn the plug over and try
to insert it the other way. If it still does
not fi t, contact a qualifi ed electrician
to change the outlet, or use a different
one. Do not attempt to bypass this
safety feature.
Important battery
precautions
• Any battery may present a risk of
fi re, explosion, or chemical burn
if abused. Do not try to charge a
battery that is not intended to be
recharged, do not incinerate, and
do not puncture.
• Non-rechargeable batteries, such as
alkaline batteries, may leak if left in
your product for a long period of
time. Remove the batteries from the
product if you are not going to use
it for a month or more.
• If your product uses more than one
battery, do not mix types and make
sure they are inserted correctly.
Mixing types or inserting incorrectly
may cause them to leak.
• Discard any leaky or deformed
battery immediately. They may
cause skin burns or other personal
injury.
• Please help to protect the
environment by recycling or
disposing of batteries according to
federal, state, and local regulations.
WARNING: The battery (battery or
batteries or battery pack) shall not
be exposed to excessive heat such as
sunshine, fi re or the like.
Ecology
Help protect the environment - we
recommend that you dispose of used
batteries by putting them into specially
designed receptacles.
For your records
In the event that service should be
required, you may need the model
number and the serial number. In the
space below, record the date and place
of purchase and the serial number:
Model No.:
Date of Purchase:
Place of Purchase:
Serial No.:
Service information
This product should be serviced only by
those specially trained in appropriate
servicing techniques. For instructions
on how to obtain service, refer to the
warranty included in this user manual.
Technical information
Product: Clock Radio
Brand: RCA
Model: RC40, RC40R
Power Supply: 120 V ~ 60 Hz
Power Consumption: 6 Watts
]
Portable Cart Warning
Changes or modifi cations not expressly
approved by Audiovox could void
the user’s authority to operate the
equipment.
Manufacturer/Responsible Party
Audiovox Accessories Corporation
111 Congressional Blvd., Suite 350
Carmel, IN 46032