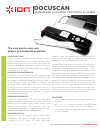
ENGLISH
1. Open box and unpack contents
SLIDES 2 PC
USB cable
Software CD
Slide holder
Rapid slider feeder
Negative roll feeder
Cleaning brush
Quickstart Poster
Safety Instructions & Warranty Information
Booklet
2. Install software
Make sure your SLIDES 2 PC is not plugged in to
your computer and insert the CD into your CD-ROM
drive.
PC: On the window that appears after you insert the
disc, click "Install Software." If this window does not
automatically appear, double-click "My Computer"
then double-click the name of the CD. The window
should appear. If the window still does not appear,
right-click the name of the CD and select "Explore."
Once the CD's contents are shown, double-click the
".exe" file.
Mac: Double-click the CD then double-click
"ImageScanTool.mpkg."
Follow the on-screen instructions to install the
software.
3. Connect scanner and open the software
After rebooting from the software installation, you
can connect the SLIDES 2 PC to one of your USB
2.0 ports.
Please note you should only connect to an available
port on your computer or through a powered hub.
(The scanner will not work through an unpowered
hub or via USB 1.1 port or older).
The power light on the SLIDES 2 PC will illuminate.
Go to Start Menu f All Programs f 35mm Film
Scanner f Launch ImageScanTool (PC) or
Applications f ImageScanTool (Mac).
4. Insert your slides/negatives and configure
settings
Insert your slides or negatives into the appropriate
slide or negative holder. Insert the slide tray you
prepared earlier until you hear a click.
Select the proper film type ("Negative," "Slide" or
"B&W") and image quality (PC: "Standard" or
"Interpolated"; Mac: "1800 DPI" or "3600 DPI").
5. Capture image & edit
You will see a preview of your image. You may need
to adjust the slide tray to fit the picture neatly.
Leave the image for the auto white balance to
stabilize; this could take approx 5 - 10 seconds.
To capture your previewed image, press the COPY
button on SLIDES 2 PC or click "Snapshot." Click
"Save" to save the picture to your computer.
PLEASE REFER TO THE USER MANUAL FOR
MORE INFORMATION ON USING THE SOFTWARE.
www.ionaudio.com/slides2pc
ESPAÑOL
1. Abra la caja y desembale el contenido
SLIDES 2 PC
Cable USB
CD software
Soporte de diapositivas
Alimentador rápido de diapositivas
Alimentador de rollo de negativos
Cepillo de limpieza
Póster de inicio rápido
Instrucciones de seguridad e información sobre la
garantía
2. Instale el software
Asegúrese de que su SLIDES 2 PC no esté enchufado
a su computadora e inserte el CD en su lector de CD-
ROM.
PC: En la ventana que aparece después de insertar el
disco, haga clic en "Install Software". Si esta ventana no
aparece automáticamente, haga doble clic en "My
Computer" (Mi PC) y luego en el nombre del CD. Debe
aparecer la ventana. (Si la ventana sigue sin aparecer,
haga doble clic en el CD y seleccione "Explore"
(Explorar).) Una vez que se muestra el contenido del
DVD, haga doble clic en el archivo ".exe".
Mac: Haga doble clic en el CD y haga doble clic en
"ImageScanTool.mpkg."
Siga las instrucciones de la pantalla para instalar el
software.
3. Conecte el escáner y abra el software.
Después de rearrancar desde la instalación del
software, puede conectar el SLIDES 2 PC a uno de sus
puertos USB 2.0.
Tenga en cuenta que debe conectarlo sólo a un puerto
disponible de su computadora o a través de un hub
alimentado. (El escáner no funciona a través de un hub
no alimentado o a través de un puerto USB 1.1 o
anterior).
Debe encenderse la luz de encendido del SLIDES 2 PC.
Vaya al menú Start Menu f All Programs f 35mm
Film Scanner f Launch ImageScanTool (PC) o
Applications f ImageScanTool (Mac).
4. Inserte las diapositivas/negativos y configure los
parámetros
Inserte las diapositivas o negativos en el soporte de
diapositivas o de negativos que corresponda.
Inserte la bandeja de diapositivas que preparó antes
hasta que oiga un clic. Seleccione el tipo de película
("Negative," "Slide" o "B&W") apropiados y la calidad de
imagen (PC: "Standard" o "Interpolated"; Mac: "1800
DPI" o "3600 DPI").
5. Capture y edite la imagen
Verá una vista preliminar de su imagen. Puede ser
necesario que ajuste la bandeja de diapositivas para
colocar la fotografía en forma prolija. Deje la imagen
hasta que el balance automático de blancos se
estabilice, lo que puede demorar de 5 a 10 segundos.
Para capturar la imagen de la vista preliminar, pulse el
botón COPY del SLIDES 2 PC o haga clic "Snapshot"
(instantánea). Haga clic "Save" para guardar la
fotografía en su computadora.
PARA MÁS INFORMACIÓN SOBRE EL USO DEL
SOFTWARE, CONSULTE EL GUÍA DEL USUARIO.
www.ionaudio.com/slides2pc
FRANÇAIS
1. Ouvrir la boîte et déballer le contenu
SLIDES 2 PC
Câble USB
CD du logiciel
Porte-diapositive
Porte-diapositive d'alimentation rapide
Porte pour rouleau de pellicule
Brosse de nettoyage
Affiche de démarrage rapide
Consignes de sécurité et information concernant la
garantie
2. Installer le logiciel
Veuillez vous assurer que votre SLIDES 2 PC n'est pas
branché à votre ordinateur et insérez le CD dans votre
lecteur CD-ROM.
PC: Sur la fenêtre qui s’affiche une fois le CD inséré,
cliquez sur « Install Software ». Si aucune fenêtre ne
s'ouvre, double-cliquez sur « Poste de travail », puis
double-cliquez sur le nom du CD. La fenêtre devrait
s’afficher. Si la fenêtre ne s'ouvre toujours pas, double-
cliquez sur le nom du CD puis sélectionnez « Explorer ».
Une fois le contenu du CD affiché, double-cliquez sur le
fichier « .exe ».
Mac: Double-cliquez sur le CD et double-cliquez sur «
ImageScanTool.mpkg ».
Suivez les instructions données à l'écran pour installer
le logiciel.
3. Brancher le scanneur et lancez le logiciel.
Après avoir redémarré suite à l'installation du logiciel,
vous pouvez brancher le SLIDE 2 PC à l'un de vos ports
USB 2.0.
Il est important de brancher à un port libre seulement
sur votre ordinateur ou à un concentrateur alimenté. (Le
scanneur ne fonctionnera pas sur un concentrateur non
alimenté ou un port USB 1.1 ou plus ancien).
Le témoin d'alimentation sur le SLIDES 2 PC devrait
s'allumer.
Cliquez sur Start Menu f All Programs f 35mm Film
Scanner f Launch ImageScanTool (PC) ou
Applications f ImageScanTool (Mac).
4. Insérez vos diapositives/négatifs et configurez des
paramètres
Insérez vos diapositives ou négatifs dans le support de
diapositive ou de négatif approprié. Insérez le panier de
diapositives préparé plus tôt jusqu'à entendre un déclic.
Sélectionner le type de film approprié (« Negative », «
Slide » ou « B&W ») et la qualité d’image (PC: «
Standard » ou « Interpolated »; Mac: « 1800 DPI » ou «
3600 DPI »).
5. Saisir une image et modifier
Vous aurez un aperçu de votre image. Vous devrez
peut-être régler le panier pour que l'image soit bien
placée. Laissez l'image pour que l'équilibrage
automatique des blancs se stabilise; cela pourrait durer
de cinq à dix secondes.
Pour saisir votre image en aperçu, appuyer sur la
touche COPY du SLIDES 2 PC ou cliquez sur «
Snapshot » (instantané). Cliquez sur « Save » pour
sauvegarder l'image sur votre ordinateur.
CONSULTEZ LE GUIDE D’UTILISATION POUR DE PLUS
AMPLES RENSEIGNEMENTS SUR L'UTILISATION DU
LOGICIEL.
www.ionaudio.com/slides2pc
ITALIANO
1. Aprire la confezione ed estrarne i contenuti
SLIDES 2 PC
Cavo USB
CD recante software
Support per diapositive
Alimentatore rapido dispositive
Alimentatore pellicole
Spazzola per la pulizia
Poster quickstart
Istruzioni di sicurezza e garanzia
2. Installazione del software
Assicurarsi che il SLIDES 2 PC non sia collegato al
computer e inserire il CD nel drive CD-ROM.
PC: Nella finestra che appare dopo aver inserito il CD,
cliccare su "Install Software". Se questa finestra non
compare automaticamente, fare doppio clic su "Risorse
del computer" e quindi sul nome del CD. La finestra
dovrebbe apparire. Se la finestra ancora non appare,
fare clic col tasto destro del mouse sul CD e selezionare
"Esplora". Non appena compaiono i contenuti del CD,
fare doppio clic sul file ".exe."
Mac: Fare doppio clic sul CD e fare doppio clic su
"ImageScanTool.mpkg".
Seguire le istruzioni su schermo per installare il
software.
3. Collegamento dello scanner e apertura del software
Dopo aver riavviato in seguito all'installazione del
software, si può collegare il SLIDES 2 PC ad una delle
porte USB 2.0.
Collegarsi unicamente ad una porta disponibile sul
computer o tramite un hub alimentato. (Lo scanner non
funzionerà se collegato ad un hub non alimentato o ad
una porta USB 1.1 o precedente).
La luce di alimentazione sullo SLIDES 2 PC si deve
accendere.
Recarsi su Start Menu f All Programs f 35mm Film
Scanner f Launch ImageScanTool (PC) o
Applications f ImageScanTool (Mac).
4. Inserire le diapositive/negativi e configurare
impostazioni
Inserire le diapositive o pellicole nell'apposito vassoio
porta diapositive o porta negativi. Inserire il vassoio delle
diapositive preparato in precedenza fino a udire un clic.
Selezionare la tipologia del film ("Negative," "Slide" o
"B&W") e la qualità dell'immagine (PC: "Standard" o
"Interpolated"; Mac: "1800 DPI" o "3600 DPI").
5. Cattura immagini e modifica
Verrà visualizzata un'anteprima dell'immagine. Potrebbe
essere necessario regolare il vassoio porta diapositive
per sistemare l'immagine in modo che sia nitida.
Lasciare che il bilanciamento automatico del bianco
stabilizzi l'immagine; ciò potrebbe richiedere circa 5-10
secondi.
Per acquisire l'immagine visualizzata in anteprima,
premere il tasto COPY dello SLIDES 2 PC o fare clic su
"Snapshot" (istantanea). Fare clic su "Save" per salvare
l'immagine sul computer.
PER MAGGIORI INFORMAZIONI SULL'UTILIZZO DEL
SOFTWARE, FARE RIFERIMENTO ALLA GUIDA
UTENTE.
www.ionaudio.com/slides2pc
DEUTSCH
1. Öffnen Sie das Paket und packen Sie den Inhalt aus
SLIDES 2 PC
USB-Kabel
Software-CD
Halter für Dias
Schnell-Zuführgerät für Dias
Zuführgerät für Negativfilme
Bürste zur Reinigung
Schnellstart-Poster
Sicherheitshinweise & Garantie-Booklet
2. Installieren Sie die Software
Vergewissern Sie sich, dass Ihr SLIDES 2 PC nicht an
Ihren Computer angeschlossen ist, und legen Sie die
CD in Ihr CD-ROM-Laufwerk.
PC: Klicken Sie im Fenster, das nach dem Einlegen der
CD erscheint, auf „Install Software“. Wenn dieses
Fenster nicht automatisch aufscheint, doppelklicken Sie
erst auf „Mein Computer“ und anschließend auf den
Namen der CD. Das Fenster sollte nun angezeigt
werden. Wenn das Fenster immer noch nicht angezeigt
wird, rechtsklicken Sie auf den Namen der CD und
wählen „Explorer“. Sobald der Inhalt der CD angezeigt
wird, doppelklicken Sie auf die Datei „.exe“.
Mac: Doppelklicken Sie auf den CD und doppelklicken
auf „ImageScanTool.mpkg“.
Installieren Sie die Software entsprechend den
Anweisungen auf dem Bildschirm.
3. Schließen Sie den Scanner an und starten Sie die
Software.
Nach einem Neustart zum Abschluss der
Softwareinstallation können Sie den SLIDES 2 PC an
einen Ihrer USB 2.0-Ports anschließen.
Bitte beachten Sie, dass Sie einen passenden Port an
Ihrem Computer oder einen Verteiler mit
Stromanschluss wählen. (An einem Verteiler ohne
Stromanschluss oder einem Port mit USB 1.1 oder älter
ist ein Betrieb des Geräts nicht möglich).
Jetzt sollte die Leuchtanzeige auf dem SLIDES 2 PC
aufleuchten.
Über das Menü Start f All Programs f 35mm Film
Scanner f Launch ImageScanTool (PC) oder
Applications f ImageScanTool (Mac).
4. Scannen Sie Ihre Dias/Negative ein und
konfigurieren der Einstellungen
Legen Sie Ihre Dias oder Negative in den
entsprechenden (Dia- bzw. Negativ-)Halter so ein.
Führen Sie den zuvor bestückten Halter ein, bis Sie ein
Klicken hören.
Korrekte Filmart („Negative“, „Slide“ oder „B & W“) und
Bildqualität („Standard“ oder „Interpolated“; Mac: „1800
DPI“ oder „3600 DPI“) wählen.
5. Digitalisieren und Bearbeiten von Bildern
Sie können Ihr Bild in der Voransicht sehen.
Gegebenenfalls müssen Sie den Halter zurechtrücken,
um das Bild an die richtige Stelle zu bringen. Warten
Sie, bis der automatische Weißabgleich abgeschlossen
ist; dieser Schritt kann etwa 5-10 Sekunden dauern.
Um Ihr Bild in der Voransicht zu digitalisieren, drücken
Sie die Taste COPY (auf dem SLIDES 2 PC) oder
klicken Sie auf die Taste "Snapshot" (Schnappschuss).
Klicken Sie auf die Taste "Save", um das ausgewählte
Bild auf Ihrem Computer abzuspeichern.
WEITERE INFORMATIONEN ZUR BENUTZUNG DER
SOFTWARE FINDEN SIE IN DER BEDIENUNGSANLEITUNG.
www.ionaudio.com/slides2pc
NEDERLANDS
1. Open verpakking en pak de inhoud uit
SLIDES 2 PC
USB kabel
Software-CD
Houder voor diafilms
Snelle dialader
Lader voor filmnegatieven
Borstel voor schoonmaken
Snelstartgids
Veiligheidsinstructies & garantie
2. Installeren van de software
Zorg ervoor dat de SLIDES 2 PC niet aangesloten is op
de PC; plaats de CD in het CD-ROM-station.
PC: Klik op “Install Software” in het venster dat
verschijnt na plaatsing van de CD. Als dit venster niet
automatisch verschijnt: dubbelklik eerst op “Mijn
Computer” en daarna op de naam van de CD. Het
venster zou moeten verschijnen. Als het venster nog
steeds niet verschijnt, klik dan met de rechtermuisknop
op de naam van de cd-rom en selecteer: “Verkennen”.
Van zodra de inhoud van de cd-rom verschijnt,
dubbelklik op het “.exe” bestand.
Mac: Dubbelklik eerst op de CD, en dubbelklik op
"ImageScanTool.mpkg".
Volg de instructies op het scherm om software te
installeren.
3. Aansluiten scanner en openen de software
Na installatie van de software wordt het systeem
herstart; hierna kan de SLIDES 2 PC worden
aangesloten op een USB 2.0-poort.
Zorg ervoor dat de aansluiting naar een beschikbare
poort plaats vindt via een hub die van stroom voorzien is
(De scanner zal niet werken wanneer gebruik wordt
gemaakt van een hub zonder stroom of een oudere
versie USB-poort zoals 1.1).
Het licht op de SLIDES 2 PC hoort op te lichten. Plaats
uw dia's in de juiste houder.
Ga naar Start Menu f All Programs f 35mm Film
Scanner f Launch ImageScanTool (PC) of
Applications f ImageScanTool (Mac).
4. Scannen van uw dia's/negatieven en configureren
van instellingen
Plaats uw dia's in de juiste houder. Schuif de eerder
voorbereide dia lade in de scanner tot u een klik hoort.
Selecteer een juiste filmtype ("Negative," "Slide" of "B &
W") en beeldkwaliteit (PC: "Standard" of "Interpolated";
Mac: "1800 DPI" of "3600 DPI").
5. Vastleggen en aanpassen afbeeldingen
Er wordt een preview van de afbeelding getoond. Het
kan nodig zijn de dialade in te stellen zodat de
afbeelding goed past. Laat de afbeelding voor de
automatische witbalans stabiliseren; dit kan 5 tot 10
seconden duren.
Voor het vastleggen van uw beeld bekeken, druk op de
knop COPY van de SLIDES 2 PC of klik op de knop
"Snapshot." Klik op de knop "Save" om de afbeelding
opslaan op uw computer.
RAADPLEEG DE GEBRUIKERSHANDLEIDING VOOR
MEER INFORMATIE OVER HET GEBRUIK VAN DE
SOFTWARE.
www.ionaudio.com/slides2pc
MANUAL VERSION 1.5
QUICKSTART POSTER | PÓSTER DE INICIO RÁPIDO | AFFICHE DE DÉMARRAGE RAPIDE | POSTER QUICKSTART | SCHNELLSTART-POSTER | SNELSTARTGIDS