DIAGRAM OF DRONE:
3
4 5 6 7
4X1.5V AA
3 米
1.5V SIZE AA/LR6
1.5V SIZE AA/LR6
1.5V SIZE AA/LR6
1.5V SIZE AA/LR6
OPEN
MADE IN CHINA
7.4V
● In order to make sure that it can meet the electromagnetic environment standard required by Aerial
Radio Station, by taking the center point of the runway as the center of a circle, all kinds of R/C
models are FORBIDDEN to be used within the radius of 5000 meters.
During the period of the Radio Regulation Command formulated, all the related departments and
authorities should STOP using the transmitter for this model within this area.
HIGHLIGHT OF THIS PRODUCT:
1. The power supply of this lithium battery is through double electric series of 7.4V 2000mAh, strong dynamic with low
consumption of the electric brush and long using life.
2. Dual protective board is built in the lithium battery to avoid excessive charging or discharging, which makes it safer.
3. 2 lines of intelligent charging control is applied on this lithium battery, these 2 PCS of batteries can still be fully
charged in the same time after many times of charging and discharging (2-line intelligent charging control).
4. Built-in high-gain 2.4G special-purposed antenna is applied on the transmitter, far controlling distance with smart
in outer shape.
5. Energy-saving low-consumption circuit board is applied on the transmitter.
6. Quick-charging circuit and MICRO USB port for the universal mobile are built in this aircraft, etc. No need to insert
or remove the batteries when charging, much more safe and convenient.
7. One-key START is applied on this aircraft and transmitter. Auto switch-off functional design, standby time is about
10 minutes, auto power off.
2.4GHz FPV real-time video and image
transmission Quad-copter
遥控器功能:
2
1
PREFACE:
Welcome to purchase our product. In order to make you use this aircraft easier and more convenient, please read this instruction manual
carefully before operating. Please also well keep this instruction manual for future reference and maintenance.
Important statement:
1. This product is not a toy but integral precision equipment integrating the machinery, electronic with air mechanics and high frequency
transmission. It requires correct assembly and debugging so as to avoid any accident. This product user should operate and control this
product in a safe way. In case of incorrect operation, it may cause serious injury or even cause damaged and loss to the property.
2. This product is suitable for the player who has experience on flying this aircraft with age no less than 14 years old.
3. In case of meeting the problem during using, operating or maintenance, please contact the local sales agent or distributor or keep in touch
with the responsible staff of our company.
Caution on safety:
This R/C flying model is the most dangerous commodity, thus please make sure you need to keep it far away from the crowd when flying.
Any incorrect installation or damage or poor control with the electronic part or not familiar with operation may cause damaged to the aircraft
or wounded people or may cause any unexpected accident. Please pay more attention to the flying safety and learn to know more dangerous
behavior or condition which may cause accident due to your own negligence.
1. Keep it far away from the barrier and crowd
This R/C aircraft may have uncertain flying speed or flying state during flying and may have potential danger.
Therefore, please keep it far away from the crowd, skyscraper, high-voltage wire, etc. Please also try to avoid flying under the bad
weather such as storm, lightening so as to make sure safety of the player and crowd, also the safety of the property.
2. Keep it far away from the moisten environment
The inside of the aircraft is composed of many precision electronic parts and mechanic parts. Therefore, please try to avoid any moisture
or water content from entering into the main body of the aircraft as it may cause the breakdown of the mechanics and electronic parts
and thus cause accident.
3. Using this product properly
Please use the original parts made by Siji Company for any re-equipping or maintenance so as to make sure flying safety. Please
operate and use under the scope of the product function permitted. Please DO NOT use it for any illegal purpose or use it beyond the
scope that the safety law and regulation stipulated.
4. Avoid controlling it independently
There may have certain difficulty during the early stage of learning in operating this aircraft. Please try to avoid operating the aircraft
just alone. On the contrary, please operate this aircraft under the guidance of the experienced players.
5. Safe operation
Please operate this R/C aircraft according to your own state and flying skill. Any fatigue, bad mental state or incorrect operation may
increase the probability of accidental risk
6. Please keep it far away from the high-speed rotating parts
When the rotor of the aircraft is rotating in high speed, please keep the player and the surrounding crowd and any other object far away
from the rotating parts so as not to cause danger or damaged.
7. Keep it far away from the heat source
The R/C aircraft is composed of the material such as metal, fiber, plastic, electronic component, etc. Therefore, so please keep it far
away from the heat source, avoid being exposed under direct sunlight, and also avoid being distorted due to high temperature or even
cause damaged.
WARNING:
1. There is important information contained in this package and instruction manual, please well keep it for future reference.
2. You have the responsibility to make sure that this model of aircraft won’t cause injury to others’ body or cause any loss to the property.
3. Please operate strictly as the instruction shown on the instruction manual when debugging or assembling this aircraft.
During the process of flying or landing, please pay more attention to keep 1-2 meters away between the user and the aircraft so as to
avoid colliding to the head or face or body, etc. or even cause injury.
4. Our company and distributors or sale agent won’t be responsible for any loss due to incorrect operation,which may cause any loss or
damage or injury to the body.
5. Children should use this product under the guidance of the adult. This product is FORBIDDEN to be used by children under 14 years old.
6. Please correctly assemble it or use this product as the correct instruction shown on the instruction manual or packing instruction. Some
parts should be assembled by the adult.
7. Small parts are contained in this product. Please place it beyond the reach of the children so as to avoid CHOKING HAZARD or
mistakenly swallowed.
8. Playing on the road or water place is highly FORBIDDEN so as not to cause accident.
9. Please collect the packing material timely so as not to cause injury to the children.
10. Please DO NOT disassemble or re-equip the aircraft as it may cause the breakdown of the aircraft during flying.
11. Batteries in the battery compartment of the charger should be inserted into the designated power which has the same logo with the
product.
12. Please use the screwdriver to loosen the screws in counter-clockwise direction on the battery compartment of the transmitter; please
also load the batteries into the transmitter as per the correct polarity of the battery. Close the battery cover and wrench tightly the
screws in clockwise direction.
13. Only the original charger made from our factory can be used.
14. Charger is not a toy.
15. Please pay more attention to the battery polarity when loading or removing the batteries.
16. “AA” non-chargeable batteries or “AA” chargeable battery can be used in the transmitter.
17. Non-chargeable battery can not be charged. Only the battery of the same brand or the battery the same as recommended can be used.
18. When charging the chargeable battery, please conduct it under the surveillance of the adult. Please also keep it far away from the
combustible object when charging. Please keep this aircraft within the eyes scope of the guardian when charging.
19. Please DO NOT make it short-circuited or squeeze the battery so as not to cause explosion.
20. New batteries are NOT to be mixed with batteries of different types.
21. Exhausted batteries should be removed timely. Please DO NOT litter around the exhausted batteries.
22. The connecting end of the power is NOT to be removed from this model. The connecting port is NOT to be short-circuited.
23. Please DO NOT make the battery short-circuited or decompose the battery or throw the battery into the fire; Please DO NOT place the
batteries near the high temperature or heated area (such as near the fire or near the electric heating device).
24. Please remove the batteries if it is not used for a long time so as not to cause damaged to this product due to battery leakage.
25. Aircraft should be kept far away from any other electric compliance or equipment as far as possible or kept far away from the place
where having the magnetic object nearby as they may cause interference with each other.
26. Please keep the safe distance from the high-speed rotating rotor so as not to cause twisted or danger of being wounded or being cut.
27. The Light Emitting Diode can send out laser radiation, please DO NOT shoot the light beam directly.
28. Please DO NOT close this product to your ear as it may cause injury to your hearing.
29. Mini USB 5V.
30. In order to comply with the command of the magnetic environment requirement formulated by the Aviation Radio Bureau and the related
authority, during the regulated period in certain area, please stop using the transmitter of this model when such regulation command is
issued.
1. Use clean soft cloth to clean this product ferquently.
2. Avoid from exposure or heating in the sun.
3. Don’t put the toy in the water. Otherwise,it’ll damage electronic pares.
4. Please check the plug and other accessories at regular intervals. If there is any damage,please stop using it
immediately until it is repaired completely.
MAINTENANCE:
PARTS NAME
Camera Display
State Display
Normal Mode Display
Headless Mode Display
Tumbling Display
Speed Display
Forward/Backward/Left/Right
Control Lever
Antenna
Throttle and Rotating
Lever
Left/Right Trimmer
Forward/Backward Trimmer
Headless/Normal mode switch
Adjust the angle of
camera
High speed switch “+”
Low speed switch “-”
3D Rolling Eversion (Press shortly and
then choose the direction by pulling
the Forward /Backward /Left/Right
Control Lever)
Press shortly:One button auto return
Keep pressing: Resetting
Press shortly: Photo
Keep pressing: Video
Mount WIFI mobile phone holder
Ordinary Mode
3D Mode
Rotating Image
Photo Function
Speed Model
Video Function
Folder
Direction Control
Console Display
Return to interface
Throttle Control
Gravity Sensor Model
Press shortly:one button takeo/landing
Double click/Keep pressing:
Stop working immediately
Press shortly:ON
Keep pressing:OFF
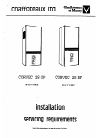
Take out the battery cover from the back of remote
control,and install 2 batteries(size AA)into the battery
case correctly (Refer to the followed picture), then shut
the battery cover.
Camera
Landing rack
Front LED indicator is on(White) Front LED indicator is on(White)
Back LED indicator
is flashing (Green)
Back LED indicator is
flashing (Red)
Motor
Blade
Protection cover
One-key switch-on
or switch-off
Socket for the rudder wire
of the Camera
Socket
of the
Camera
Charging socket of the
Quad-rotor
LOADING OF THE
PROTECTIVE RING
LOADING OF THE
CAMERA
LOADING OF THE
LANDING RACK
Open the battery cover of the fuselage
and then load the lithium battery.
Please select the same color of the wire and
then connect with the power interface.
LOADING OF THE
LITHIUM BATTERY
ASSEMBLED REMOTE CONTROLLER
CHARGING TO THE
QUAD-ROTOR
CHARGING INSTRUCTION OF THE LITHIUM BATTERY:
CAUTIONS WHEN CHARGING:
1. When charging,please put this product on a dried or ventilated area and keep it far away from heat source or explosive producet.
2. When charging,please remove the batteries from the quadcopter. Then charging process should be supervised by an adult so as
not to cause an accident.
3. After flying,please do not charge the battery if the surface temperature is still the battery has been used for a long time,or appears
to be swollen,please replace them.
4. Please make sure that you use the original USB charging cable provided. When the battery has been used for a long time,or appears
to be swollen,please replace them.
5. A battery when not in use for a long time will lose it’s charge automatically.Charging or discharging too often may reduce the of the
battery.
PREPATATION FOR FLIGHT:
OPERATING METHOD:
Hover up and down
Push the throttle up or duwn,the
quadcopter flies upward or downward.
Push the direction lever up or down,
the quadcopter flies forward or
backward.
Forward and backward
Turn left and right
Pull the throttle left or right, the
quadcopter turns to left or right.
Pull the direction lever left or right,
the quadcopter flies to left side or
right side.
Sideward fly
1. Balanced charging:If the power switch of the quad-copter is on the state ON/OFF,The Quad-copter can be charged.
Inserting the USB cable into the USB port of computer,and then connect another end of the charging cable(Micro
USB)with the charging port of the drone,when charging,the indicator on the powwer switch turn red;when full
charging finished,the indicator on the power switch is OFF.
2. Quad-copter can be charged by the mobile power or car-loaded power.
3. Full charging time takes about 4 hours.
Normal flight mode is turned on by default,and conventional flying quadcopter fly.
Press the Camera Key shortly to access into the Pressure Height-setting Mode. This time the height of the Quad-rotor
will be kept on the current height. Push upward the Throttle Lever and the Quad-rotor will be ascending.
Push downward the throttle lever and the Quad-rotor will be descending. When the throttle lever is returned back to the
neutral position and the Quad-rotor will automatically set the height. Press shortly the Camera Key to exit the Pressure
Height-setting Mode.
Place the Quad-copter in the front forward. After finish decoding and taking off, press shortly the headless Mode Key
on the transmitter to access into the headless Mode. Press shortly once again to exitthe headless Mode.
KEY FEATURES OF QUADCOPTER:
NORMAL MODE:
HEIGHT-SETTING MODE:
HEADLESS MODE:
Auto-return function With 6-Axis GYRO Control distance:about 350-400 meters
With Headless Mode With colorful flashing lights Image transmission distance:about 60 meters
With blade protector Motor type:Coreless motor Flight time:about 15 minutes
With 2.4GHz Radio Control Technology Easily to replace the battery
Battery of the Quad-copter:Series 7.4V 2000mAh li-polymer Charging time:about 3-4 hours
Battery of the transmitter:4XAA(not included)
When you are familiar with some operating bacic skills,you can try to
do some excited rolling flight.Operating the Quad-copter at the height
of about 3 meters,press the rolling button,and pull up the direction stick
to forward/backward/left/right to the highest position,it can be realized
rolling forward/backward/left/right.
FLYING ACTION
Tios: 3D eversion goes better when battery power is enough.
3D EVERSION INSTRUCTIONS
CAMERA CONFIGURATION:
75°angle-adjustable R/C camera is equipped, when the rotary camera is loaded, the
forward/backward tumbling key will be automatically switched into the Up/Down angle
adjustment key on the Camera.
Have a press on the Up/Down angle-adjustable key is for slight movement left and right
of the angle for 2 degree, keep pressing it for successive rotation.
Download the real-time aerial-photographic software "SJ A1003 FPV", which enables the aircraft to make FPV real-time transmission
during the course of flying.
Turn left/right-tuning Sideward fly fine-tuning
When the quadcopter keeps
rotating to left/right,you can
correct it by pressing the
fine-tuning button right/left.
When the quadcopter keeps
flying to left/right side,you can
correct it by pressing the fine-
tuning button right/left.
CAMERA CONFIGURATION:
A1002 200W Camera
THE PROBLEM REASON COUNTERMEASURES
The indication light of the quadcopter
is flashing and without reaction when
operated.
The quadcopter is blades turn around
but the quadcopter canot take off.
1.Frequency modulation between the
quadcopter and remote control is not
operated correctly.
2.Insufficient battery power.
1.Insufficient battery power.
2.The blades distorted.
1.Refer to the Preparation for taking off, and
re-modulate the frequency.
2.Recharge the battery.
1.Recharge the battery.
2.Replace the blades.
The fine tuning button are all on but
the quadcopter still couldn’t keep
balance.
1.The blades distorted.
2.The motor doesn’t work properly.
1.Replace the blades.
2.Replace the motor.
The quadcopter shakes hardly. The blades distorted. Replace the blades
The quadcopter becomes of control
after crashing.
Three-axis acceleration sensor lose it’s
balance after crashing.
Put the quadcopter on the ground for 5-10
seconds.
COMMON PROBLEM AND SOLUTION INSTRUCTION:
SPARE PARTS (Sold separatly):
TAKE PHOTO
SOFTWARE DOWNLOAD AND INSTALLATION:
INSTRUCTIONS:
QR code of “SJ A1003 FPV”software
for Apple IOS system
(Please scan this QR code to
install this software).
QR code of“SJ A1003 FPV”software
for Android system
(Please scan this QR code to
install this software).
Connect with the power of this model, and then access into“SETTING”in the mobile, open the“WIFI”and find the
“SJ A1003FPV” which corresponds to A1003 for connecting. When the link is successfully connected, please exit
from the Setting Option. Open the same software “SJ A1003 FPV” in the mobile and then click the icon“PLAY” to access
into the control interface to make real-time recording.
Open the software
“SJ A1003 FPV”
Click the "PLAY" logo Real-time image or video will
appear on the mobile screen
Controled by your smart phone
By pressing the photo mode key,the red light would flash at once,that means the
quad copter is taking photo.
by pressing the video shooting mode key,
the red light turns into constant on, that
means the quad copter is taking video.
4GB
Warm tip: press the video shooting key again to
save the video when finish the video
shooting.
Warm tip: An AVI form should be compatible to
the video playing software.
1. By pressing the photo mode key of the remote control,the red light would flash once,that means the quad-copter
is taking photo; by pressing the video shooting mode key,the red light turns into constant on,that means the quad
copter is taking video.Press the video shooting key again to stop the shooting and the red light turns off,which
means the video shooting is finished.
2.Press the Memory card slightly to take it out,then insert the card into the card reader and insertit into the USB
outlet of the computer to read the data of aerial photography from“my computer”---“portable hard disk”.
75°manual angle-adjustable HD Camera is equipped (2 million/720P physical
pixel), 4GB Memory card and card reader.
Insert the Memory card slightly into the webcam module’s card channel which
on the bottom of the quad copter,connect the quad copter’s power,and finish the
frequency modulation of the quad copter and remote control,the blue indication
light on the webcam module is become constant on,them the players could
operate the remote control to take photo and Video.
Warm tip: the red light indicator will be flashing quickly when the Memory
card is not inserted or full.
T7006 USB
T7007 Motor
T7005 Battery
A1003 WIFI Camera
T7001 Blade T7002 Landing rack
T7003 Protective ring T7004 Receiver board
Press shortly: Photo
Keep pressing: Video
With the 6 axis gyroscope,you can throw the quadcopter and push the
throttle right up,it will automatically level out andhover smoothly in the
sky,this can also be done when the quadcopter is rolling.
1. please operate in spacious indoor or outdoor without rain or snow,and wind power should be below 4 grade,be away
from people,animals and obstacle.
2. Make sure the battery of the quadcopter is well installed and connected.Turn on the switch of the quadcopter,the
indication light of the quadcopter is flashing,then put it on the flat place and wait for the frequency adjustment.
3. Turn on the switch of the transmitter,pull the throttle stick to the highest position,and then pull the throttle stick down
to the lowest position.There will be a sound"DI"and the indication light of the quadcopter is on,that means the
frequency adjustment is connected completly and it is ready for flight.
Ages 14+
Instruction Manual